Spring is coming after a long winter’s night… read on to find out how to make your complexion bright! So go head, bring some real roshni to your complexion with these spring beauty tips!
As winter enters its second and final act, it becomes apparent that many South Asian beauties, myself included, bear its ill effects: namely a sallow complexion overrun with dead skin cells. Spring is a fantastic opportunity to tweak your routine whereby you switch out one or two products, and/or add in new rituals, so that you can reclaim your beauty birthright: a glowing complexion that radiates warmth.
Read on to learn how to shed your sallow complexion in time for spring…
STEP 1: EVALUATE YOUR CLEANSING ROUTINE
It is tempting to switch automatically to a gel, and other lightweight cleansers, in particular if your skin is oily, because the temperature is climbing upwards. The dramatic jump might be too much for the skin, because even if the temperature hovers slightly above the freezing point, homes and office buildings are still fully-heated and the weather vacillates between chilly to quite cold.
I recommend lightening up on the texture of the cleansers so that they allow your skin to transition from the dead of winter to the heart of spring. The change in texture permits your skin to become more open to ingredients and fresh air, rather than being cushioned in layers of hydration.
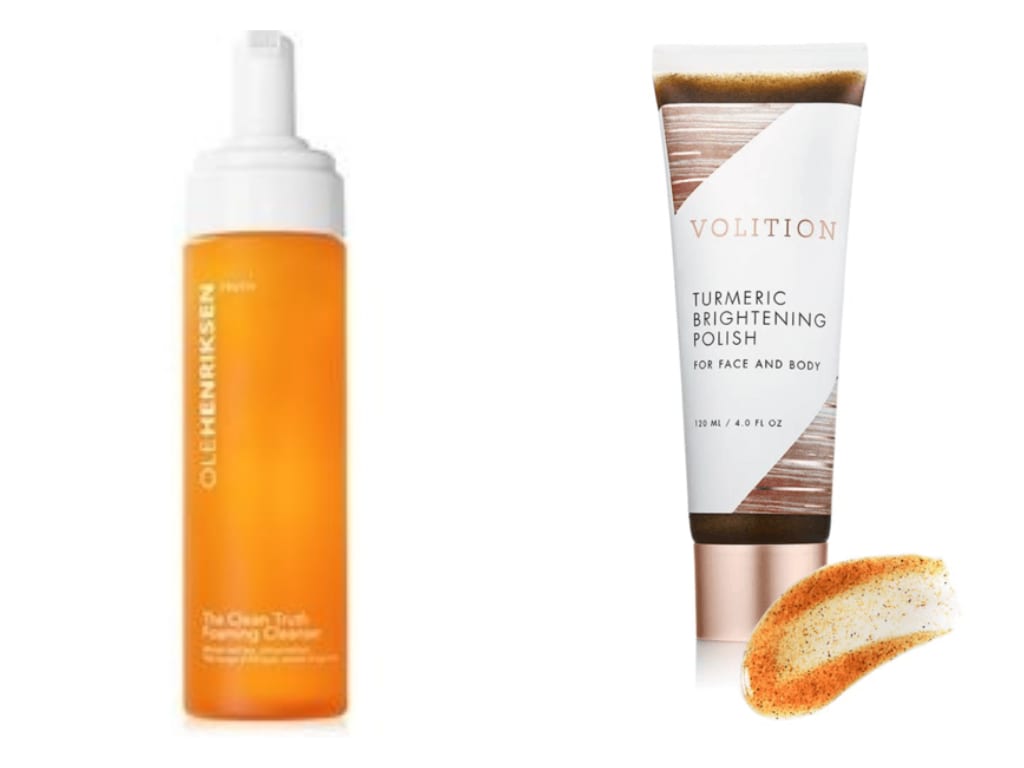
I recommend the Ole Henriksen The Clean Truth™ Foaming Cleanser because one full pump of this lightweight, antioxidant-rich foam is all you need to gently cleanse the skin after a night’s sleep. I love how the bubbles gently caress the face, and the scent of freshly-peeled fresh oranges awakens the senses.

For the evening a prefer to indulge in a cleansing ritual whereby I use a face balm such as the Beautycounter Cleansing Balm which includes vitamin C to brighten the skin; and raspberry and cranberry seed oils to hydrate. I take a small dollop and massage it into my face. Afterwards, I wet the cleansing cloth, included in the package, with warm water, and pass it over my face and neck. My face feels soothed, and the make-up is removed, leaving it open for night time care.

STEP 2: EXFOLIATION: APPROACHES AND ACIDS
Fruit and lactic acids have been used since at least the antiquity to gently exfoliate the skin. Legend has it that Cleopatra relied on milk baths to keep her skin smooth and radiant.
In our times, the principle of using acids drawn from food found in nature to exfoliate the face and body is still a popular approach.
Exfoliation then becomes issues of 1) how much of these acids can you use if your skin is sensitive; and 2) for many South Asian beauties, the micro tears caused by excessive use of granular exfoliators causes hyperpigmentation.
I recommend that after cleansing the face, you can gently tone and exfoliate the skin in one step by massaging it with a toner. I go for the Beautycounter Rejuvenating Toner Pads which are infused with vitamin C, and extracts of algae and lentil seed. The pad glides seamlessly across the skin and it is as gentle as a baby’s kiss. The pad gently lifts away any cleanser that has been left behind and some dead skin cells. If your skin is sensitive, this step might be your last one in terms of exfoliation.

If you can increase the intensity, then carefully tap a few drops of an acid-based toner such as Ole Henriksen Glow2OH™ Dark Spot Toner. The product is based on alpha hydroxy acids which are derived in foods such as fruit (e.g. apples, sugar cane, sour milk etc.). The toner feels like fresh water when you tap it in (always avoiding the eye area), and after a week, I noticed that my cheeks were already more smooth.


If your skin is oilier and thicker, add in a granular exfoliator on twice or three times a week. Remember to always avoid the eye area, and concentrate on those parts where blackheads accumulate such as the nose and chin. The technique should be to use a light hand and to go over the planes of the faces using circles, as this minimizes the risk of micro tears and infuses the ritual with a massage. I love the Volition Turmeric Brightening Polish, because aside from its inclusion of turmeric, a classic South Asian spice that brightens complexions, it is mixed with sandalwood (another South Asian ingredient!) for toning, and olive oil for hydration. I like to apply it all over my face for 2 minutes then with massage my face with gentle circles, and then rinse, using tepid water.
STEP 3: ADDING EVEN MORE VITAMIN C
Vitamin C is a superstar ingredient for brightening complexions, and if your skin is normal, combination or oily, it is a great addition. It has been a tough ingredient to capture because it oxidizes quickly and loses its potency. I salute Reversa because its Radiance-C Concentrate contains 20% pure vitamin C, and since the bottle is opaque and the pump is closed, the product maintains an excellent quality. I use one pump to massage both my face and neck each morning. The white cream spreads quickly, is rapidly absorbed by the skin and leaves a slightly dry finish. The dryness is short-lived as a quick application of moisturizer leaves the skin smooth. My skin immediately accepted this product, and my cheeks looks brighter after several days.

The presence of vitamin C in this product means that you should avoid adding other acid products. I experimented by using the Ole Henriksen toner and then this product, and my skin experienced an uncomfortable tingle. Remember, layering on products does not mean that your skin will look better; it just guarantees a reaction. The skin is an organ, like the brain or heart, and should be treated with gentleness and respect.
STEP 4: BRIGHTENING THE EYES
I appreciate the arrival of spring but for the first few weeks, I am aghast at the intensity of my dark under eye circles. I am thrilled to report that the Ole Henriksen Banana Bright™ Eye Crème delivers on its name. Its smells vaguely of a ginger cookie, and with a few gently placed taps my fine lines plump up instantly and vitamin C brightens. Moreover, its soft yellow tinge adds warmth to the area and I look refreshed.

STEP 5: PROTECT THE EFFORT AND APPLY SUNSCREEN
Unfortunately, too many people discard sunscreen during the winter months because they mistakenly believe that if you do not feel the sun’s warmth that its UVA and UVB rays do not impact the skin. The fact is that these rays break through the atmosphere and the clouds and age and burn our skin.
If spring is a time to start anew, adopt the important habit of using sunscreen. I appreciate how the Shiseido Urban Environment Oil-Free Protector (SPF 42) protects against the UV rays, without clogging my combination skin. Moreover, my skin is a solid medium tone, and I confirm that it does not leave an ashen cast. This is lightweight sunscreen should be a contender for a place on your daily vanity; it has earned a spot on mine.

SALLOW THOUGHTS BE GONE
Spring is a fairly short, but exceptionally intense, season because the weather is unpredictable, and it can wreak havoc on the complexion. This is why I suggest to make only a few key tweaks to your routine so that your skin reclaims its brightness without the risk of redness.
Meena Khan | Features Editor - Beauty
Author
Meena (@meenalaregina) always loved the idea of exploring the non-conventional idea of beauty. Having grown up as a pimply chubby teenager, she wanted to see the change in the world that best reflected your uniqueness as well. Her well-received collection of blogs where she tries on various beauty p...


