We review Cover FX latest contour kits and check out our super DIY tips!
Concealer is a major makeup staple, even for super-natural ladies. I have always been a very big fan of Cover FX. Developed to cover scarring and various skin conditions, Cover FX formulations are superior in quality. No matter what your skin tone, there will be a concealer to match any ethnicity.
I recently got the opportunity to use the Cover FX Contour Kits and I love them. Whether you have more fair skin or are a darker skin tone, Cover FX has these kits for everyone. There are three kits – Light, Medium and Deep.
Photo Credit: www.coverfx.com
Each kit contains four concealers in a beautifully packaged palette which also contains a mirror that is large — a huge plus. The first concealer is your actual skin tone. This is perfect for covering up any imperfections. Since contour and highlight are all the rage right now, the kit also features a highlight, contour and shimmer palette.
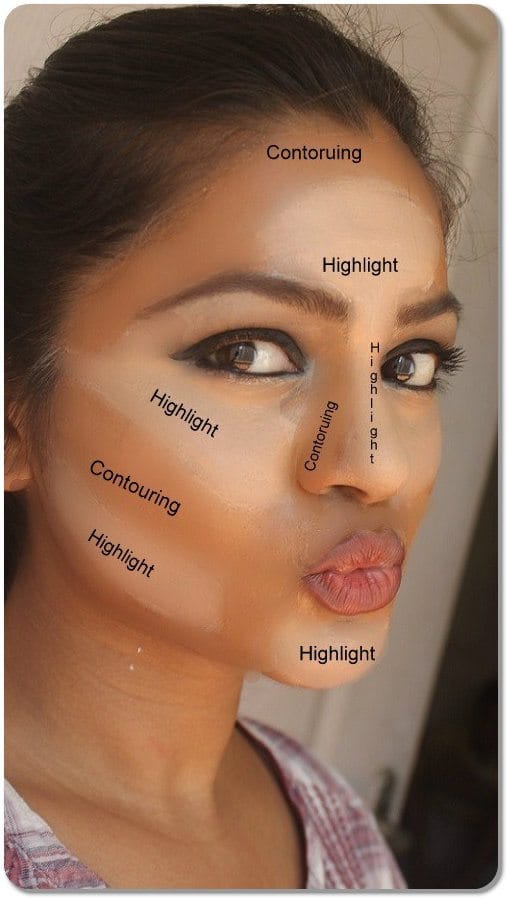
Check out this very easy chart at the top to learn the best techniques for achieving the perfect highlight/contour for your face shape.
DIY Tip #1:
A very simple rule is that highlight emphasizes and contour minimizes. You always want to have the two side by side to create the biggest impact and illusion. Use a foundation or concealer brush or an egg sponge. Blending and symmetry are key as well.
After foundation application, apply the actual colour of your skin tone to any blemishes and imperfections. A little bit goes a long way. A concealer brush or clean fingers may be used. Dot on the area on your face you would like to cover and blend out the edges.
I love the Ultra Pro Foundation by Face Atelier. It comes in a variety of shades for every skin tone. Silicone is added to the formula which works very well as primer and stays put even through sweating and a swim for flawless results.
 Photo Credit: www.faceatelier.com
DIY Tip #2:
For any area you would like to emphasize, such as cheeks and chin, apply the highlighter with a foundation or concealer brush. For maximum impact, apply the contour (darker tone) next to the highlighter. This will further the illusion even more. For example, if you have a very narrow nose, applying highlighter all the way down the bridge will give the illusion that it is wider. Apply contour to the sides of your nose for maximum results. A small chin may be emphasized with highlight and contoured underneath the chin to make it look larger and sculpted. This method works very well on any area of the face. Either using the beauty blender or the foundation brush (make sure to blend highlighter first and then contour as it is darker) blend out the symmetrical lines. The result should look natural however enhanced.
Photo Credit: Beauty Blend
Use a translucent powder to set the makeup.
DIY Tip #3
A great tip is to use a little moisturizer to thin out concealer to use as a foundation.
Main Image photo credit: http://fabfashionfix.com
Original Post: November 28, 2016
Hina P. Ansari
Author
Hina P. Ansari is a graduate from The University of Western Ontario (London, Ontario). Since then she has carved a successful career in Canada's national fashion-publishing world as the Entertainment/Photo Editor at FLARE Magazine, Canada's national fashion magazine. She was the first South Asian in...


